Skills Drills #4 Minimizing effort

In this Skills Drill I will ask you to consider how much pressure it really takes to turn your kite. This will take a great deal of concentration on your part as there is so much going on while riding. But that is exactly why this drill is important. To learn more about every aspect of kiteboarding, some times we must isolate each task to understand the whole. This practice is most valuable during light wind conditions, but can be performed any time.

The Drill: Once you are comfortably riding start to really concentrate on how much pressure you assert on the bar each time you go to turn the kite. Whether you are turning to jibe, or just cycling the kite through a series of figure eights for power, force yourself to pull on the bar only as much as it takes to get a reaction from the kite. Once the kite has responded to your input, pull the bar no further and wait for the kite to make its turn. Again this takes a lot of concentration, but you will feel a difference in how your riding will become much more relaxed. And that is always a good thing!image

Skills Drills #3 Looping Down the Line.

This Skill Drill is for the more experienced kite surfer. If you are capable of boosting jumps consistently, can easily preform a toe side turn, then you should be ready to take this challenge. The drill will require you to Down Loop your kite, if you need to know more about this subject follow this link:
Down Looping
Conditions for this drill should be side shore winds, 12-18 Knots. Down winders are the best time to practice this drill as you will burn up a lot of real estate while performing it. Most fun when performed in small surf.
Drill: While riding heel side on port tack, bring the kite high to 11:00, then pull down on the left side of the bar to down loop the kite and perform a toe side turn. Keep pulling on the left side of the bar so that the kite begins to climb again and as it passes over the top of the wind window perform a heel side turn. Still keep the pressure on the left hand side of the bar, and as the kite down loops again perform the second toe side turn. Still holding pressure on the left hand side of the bar the kite will climb again to the top. You have now sent the kite through two full loops, turning toe side, heel side, toe side, and finally back to heel side. At this point the friction between the twisted lines will become great so it is time to reverse the rotation of the kite. Since you had pulled on the left side of the bar the kite rotated counter clock wise. Now you will pull down on the right side of the bar to down loop the kite in a clock wise rotation 2 complete revolutions.
If you are in flat water this drill will closely resemble carving through a slalom course behind a boat. If you are in some small surf …well …you know what to do!

Kite surfing with Strapless Surfboards

If you are new to kiteboarding chances are you learned to ride using a good sized twin tip complete with foot straps and pads. And maybe you have even moved on to riding a smaller twin tip for better edging and jumping. But if you live and ride on the coast where there is some sort of surf, surely you have seen and possibly wondered about the guys and girls out there riding strapless surfboards. Ask those that ride them and most of the time the answer you get is “Now that I’ve mastered this style I rarely ride my twin tip.” The first question I’m usually asked by twin tip riders is “How is it even possible to ride without straps?” Or “What keeps you attached to the board?” And I answer “Gravity and centrifugal force”. What really bothers me though is when I offer to let someone try it and they say ” Oh no I’m not ready for that yet.” As if 5 more years of riding a twin tip will somehow help prepare them for riding a surfboard. The simple fact is, riding a surfboard is easier than riding a twin tip. I used a surfboard for my very first ride and rode 50 yards the first time I dove the kite. My wife did as well. And just recently I used a surfboard to train a young rider and the very first time he attempted to ride he rode off on plane for 200 yards! And without straps! Here are some advantages of riding a surfboard.
– With soft, round rails, and a thicker core, boards are much smoother feeling and are much easier on the body as a result.
– The boards overall size gives it a much greater planing surface so it takes much less wind to be powered on one. And you can typically use a smaller kite.
– Surfboards don’t rely on their edges as much as they do their fins for lateral resistance so are much more efficient when riding upwind.
– And lastly they are just plain fun to ride! There is something very free feeling too, by not having your feet tied to the board.
Now the first few times you take it out in waves, you will loose the board and chase it quite a bit. But here a few tips that will help you get through that.
The main difficulty is being pulled off the board as you pass over waves heading out. The goal is to keep constant contact between our feet and the deck of the board, even as we pass over the crest of a wave. If we keep tension in our kites lines and are fully powered as we are passing over the wave, the board will drop out from under our feet as we pass the crest. To counter this we must bring all of our weight to bare on the board as we pass over the wave.
– you can slow you speed to a crawl but that is not very effective, because the wave is traveling toward you with some speed as well. I use this technique to climb over huge white water.
– Sheeting out entirely just before the wave reaches you works pretty well. By depowering the kite, your body weight will increase over the board.
– I think the best method is to turn down wind briefly just before passing over the wave. By turning toward the kite you release the tension in the kites lines and this brings more of your body weight over the deck of the board. At the same time you will be crossing over the wave at a lesser angle, which makes it feel that much smoother.
– And lastly, don’t go over the wave stiff legged, bend your knees at the appropriate moment to absorb the swell, then straighten them after passing the crest.
– Jibing is a skill that will take some time to master. If you are regular footed ( most comfortable with your left foot forward) and riding on port tack, carve through a toe side turn. Once you have completed the turn bring the kite up in the sky to about 1:00, and while it is creating some lift, quickly switch stance to goofy foot. To switch stance, move your front foot back a bit and place it over the centerline of the board then step across and reposition your feet. If you are regular footed and on starboard tack (riding goofy footed) you will likely find it easier to switch stance before you jibe. This way you will be more comfortable as you go through the turn.
If you are the type that wants to boost big air all the time, or are interested in wake style unhooked tricks twin tips are the way to go. But if you want to ride waves, or are content to cruise and just enjoy a day on the water, I think strapless surfboards are worth looking into. And don’t wait, once you try it you will likely never look back.

Notes from the Judges tower

Recently a couple of our young friends began competing in surf and SUP events. Hearing this always inspires me to want to help. I remember competing when I was 14 in ESA contests in the 70’s then again in the 90’s and for many years I sat in a judges seat heat after heat watching the action go down, calling colors and scratching down scores.. Free surfing and competitive surfing require two different types of thinking. If you go to a contest and spend $50 on an entry fee and go out in your first heat expecting to just free surf for 15 minutes, you’d be better off spending that money taking your girl to Outback. But if you want to advance all the way to the finals and surf the main event? Your head needs to be a deeper place entirely. You need to take action! So in no particular order here are some things to think about. Not all of these tips come from the perspective of a surfer in the line up, but also from the judge who sat watching good riders loose valuable opportunities to go further if it wasn’t for just a few small details.

Be prepared: From the time you arrive in the morning check the heats board and schedule regularly for when you will be riding. Those times can change through out the day so check often. Pick up your jersey as early as you can and put it on. You should be sitting at the waters edge a full heat (15 mins, ) before your heat goes out. Use this time to watch the heat before yours and pick up on things like where the best waves are breaking, is there a current? Do you need to walk up the beach before paddling out? If so,that takes time, don’t spend 3 mins. of your 15 running up the beach after the horn blows. Stretch. Relax.

Understand the rules: usually at each event there will be a meeting, and during that meeting the organizers will explain what is expected from each competitor, how to score the highest points, interference rules, flag colors and sequence, etc. These rules can be very important to your strategy, especially wave counts. You may be catching a lot of waves in one heat and if your best wave… A 9.5 is your 11 th wave, guess what… No score for you if there is a limit of 10 waves per heat. Some rules call for riders to catch at least 4 waves to advance out of a preliminary heat. If you catch 3 waves and score 7, 6, 8. And a another competitor catches the minimum 4 waves required with scores 2, 4, 3, 2 guess what, he advances, and you don’t. Some times it is just a matter of turning around and catching some white water and jumping to your feet that will get you to the next heat not a 6 second barrel.

Wave selection and Timing : So you’re out there in the line up and you have only 15 mins. to impress the judges. That is not much time, so first, if you can, try to avoid sitting next to other competitors in the line up. If there are good waves everywhere spread out so you don’t get into an interference situation. It costs time and you can get frustrated and it can wreck your mood.
Of course we all want to catch the best waves out there, that is no dought the goal. But most of the time those come after your heat! The next goal is to catch your minimum required. On days when there are lots of waves, say S.E. wind chop, you can be a little more selective and picky. One strategy would be to catch a few early in the heat then become selective, spend more time looking for a wave that will give you a longer ride. But watch the time, if you have 5 mins. left and you have only caught 3 waves… It may be time to move in and catch that white water.
Some long period swells arrive to the lineup infrequently,and you may be lucky to catch 4 waves in your heat. In that case you need to be less picky and catch what ever you can. This is the ugly side of contest surfing but remember, when you are riding in crappy surf…so is everyone else.

Wave riding: Now to the fun stuff. During the riders meeting they usually describe what it is that they are looking for to score high points, things like being in the proper location on the wave, sharp turns, difficult maneuvers etc. but what it comes down to is this, you should ride a wave in the most comfortable manner that you can, because the longer you ride a wave the more impressive it is, and the more opportunities you will have to perform more maneuvers. When it comes to difficult moves it’s your call. Go for it and risk eating it, which by the way counts for nothing or being more conservative and pulling it off for the sake of a successful ride. These are decisions made in a split second where the contest is won or lost.

Have an advocate: Judges have a hard time keeping track of who is up and riding when many riders are up at once. And sooner or later their attention can wander as well. ( it takes a lot of discipline to remain focused for 6 to 8 hrs ) it is a good idea to have a friend or family member sit close to the judges tent and “Spot ” for the judges. When you catch a wave your spotter should shout “Blues up! ” not your name, they may not know who you are. The judges don’t mind this kind of thing, in fact most find it helpful. Without a spotter there could be two riders up and all eyes are on them. You drop into another 6 second barrel and guess what… There are no witnesses! But seriously, heats and contests are won by just a couple of points sometimes, so every one counts!

Visability : the contest area you surf in is like a stage. The judges sit at the center of that stage. From our perspective things that happen closer to us seem more impressive than rides that we see 50 yards away, if we see them at all. You can’t always be at center stage. Just try not to get too far away.

Free surfing before your heat: You should always go out for a surf to warm up. But don’t spend hours out there getting fatigued. And as conditions change through out the day you should go out a few times but again not for long.

Spotting or judging: One of the best ways to learn about competitive surfing is to see what the judges see. If you can volunteer to spot or judge do so. You will gain a whole new perspective.

Some tips on controlling the line up: Part of the fun of surfing heats is not just the wave riding but what goes on to catch those waves. Jockeying for position and possession of waves is a game unto itself. First, you must be confident! Never be indecisive! If you see a wave you want, paddle hard for it, even if others are paddleing for the same wave. Pretend they do not exist. Even if they have right of way, for one thing you never know if they will catch it or not. Only at the last second should you sit back and let your competitor drop in. This will let them know you are serious. Respect is earned through action. Don’t paddle for waves then fail to catch them.
One way to break up a crowd or get someone off your hip ( and this will only work once , so use it sparingly ) is to act as though you see a clean up set coming in, and start paddleing for the horizon. If you sell it right and at the right moment, others will follow you out into deep water beyond the point where the sets are breaking. Then casually turn and paddle back to the line up. If you time it right they will be too far out to catch the waves and you’ll have the set to yourself.
Another move is to act as though you want the first wave in the set. Competitors love to scrap over waves, once they are committed to catching the wave just sit up and let them have it, then make your move on the second wave in the set. Without anyone else around there is less tension when catch that wave and less tension should leave you with a more relaxed start to your ride.
When ever possible, be selective about the waves you catch. If it looks like the wave is going to close out, don’t catch it. You will loose valuable time paddling back out and gain very little from a score of 2.

Performance: I think a lot of kids have a misconception of what it takes to win heats. Huge airs, 360’s, the stuff we see in all the videos. Those moves are impressive and do score high points, but only IF they are done successfully, and at the proper time. And only paired with good wave riding skills will those moves prove effective. The fundamentals are what go furthest. Catching a wave at its peak. Being in the right place at the right time on the waves face, and knowing what to do when you are there. Utilizing the entire wave top to bottom, shoulder to pocket. Being able to develop speed for powerful turns and knowing how to shed speed when that’s appropriate . And of course looking comfortable and balanced the entire time. Taking everything you can from the wave until the wave has nothing more to give. That… Is what makes a show! And that…Is what gets judges excited!

We all wish we could surf like Slater, pull off anything, make it look flawless. And indeed those pro riders should be every competitors inspiration. They are at the top of the ladder that you are also on. But it is a very tall ladder. In the end competition should be good clean fun. A way of challenging ourselves to do better, or maybe just a reason to get excited about waking up early on a Saturday morning.
The value of patience while learning to Kiteboard

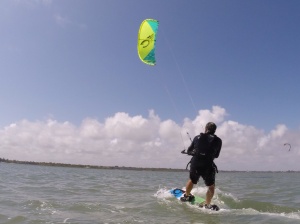
One of the most important qualities that a new kiteboarding student can posses is patience. In many of my instructional blogs you will here me say “do not rush”. In the students first few months of kiting, keeping the kite flying is like balancing a baseball bat on the end of your nose. As hard as you try sooner or later the kite comes crashing down. The only way you can move forward in the process of kiteboarding is to keep the kite in the sky. And the longer we can keep the kite in the sky the more time we have to experience what is going on and learn how it all works. Not being tense is also important. The first few times that we fly we are naturally apprehensive about the power of these great big kites, get nervous and react by becoming tense. Piloting a kite requires utilizing many of our senses, the most obvious is sight, but feel is also very important and if we are too overly tense we can not feel what the kite is trying to tell us. I had a student in the water and he was so close to getting up and riding, he was doing so well but the one thing that I could see, was that he was just trying too hard. After several attempts at the water start each ending unsuccessfully, I finally had him put the board on his feet, bring the kite to 12:00, and then I ask him to count to 10 before he tried to perform the water start. He did as I asked and when he did dive the kite, he rode away for 100 yards.
Even in my own experiences I have been frustrated from time to time with my own performance, and upon analyzing what might be going on I usually come to the conclusion that I’m trying too hard, and as I begin to relax everything begins to fall into line, and I have a much better experience.
So check your tension level once in a while. Ask yourself to relax, go with the flow. And you will soon get more power from your kite, find the groove on your board, and feel all that is going on.

Skills Drills #2 Figure 8’s

Figure 8’s
In this Skills Drills you will practice one of the most important skills you can have in your arsenal to find power. The figure eight is the fastest and most effective way to get your kite back into the power zone and away from the the edge of the wind window!

Drill: Standing on the beach with your trainer kite, or while body dragging with a power kite, bring the kite to a stationary position at 12:00 overhead for several seconds. This is an important time, spend this moment relaxing and becoming focused. Count to 10 if you have to. Do not rush. You are now ready to start the exercise. From 12:00 move the kite to the 11:00 on the left then dive the kite to the right but only for a short time then turn the kite 180 degrees and fly it back to 12:00 turn the kite again to the right and dive it once again on the right side of the wind window but deeper this time ( by deeper I mean dive it closer to the ground) then turn the kite 180 degrees again and back to 12:00 turn once more and dive the kite still deeper turn and fly back to 12:00. Bring the kite to a full stop. Now do the same exercise only to the left this time. In my description of the drill you will notice there were no comas. There is no time for pausing or hesitation during a series of figure 8s!
Key points:
Keep the kite moving! If at any time during the drill the kite stops moving forward quickly you have failed. Bring the kite to 12:00 and start over.

Dive the kite more vertically, less horizontally.

Always return to 12:00 before the next dive.

Anticipate 12:00, do not fly much past 12:00.

20140310-110121.jpg

20140310-110136.jpg
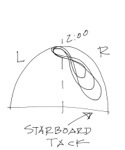
Avoid flying the kite in future 8s across the top of the wind window from 10:00 to 2:00. This is counter productive toward the end goal of kiting in one direction i.e. starboard tack. Practice figure 8s on one side at a time. And when it comes time to ride you will benefit a great deal from these drills. Never think you have done this exercise enough! You should be able to increase the amount power you get or decrease the power by adjusting the shape of the figure 8s.
When the day comes to try your first water start your understanding of good figure 8s will become immediately evident in your success or failure to ride, they are that important!

Skills Drills #1 S turns

Welcome to my new category “Skills Drills”. Here I will post drills that challenge riders to move beyond their comfort zone to develop new skills, and understanding of the sport of kiteboarding.

S Turns

Now that you have mastered the water start and have ridden a few hundred yards at a time, it is time to figure out how the board works and how to make it work for you. This drill is designed to get you to change course. That is the direction in which you are riding. I.E. from 90 degrees east to 130 degrees south east and back again. This will give an idea of the effects that a change of course will have on things like speed, upwind progress, and the limitations of too great of a course change.

Drill: As you are riding on your heel side edge, back leg bent, front leg straight, leaning against the kite, arms out, bring your body to a more vertical stance while still standing over you back foot to keep the nose of your board up. Now lean toward your toe side edge and re direct the board in a more down wind direction. A course change of maybe 30 or 40 degrees. Not 5 degrees. This course change should only last 2-3 seconds, and then back to your original course. The kite should remain at the same elevation (45degree angle).

Goal: To carve S Turns in a consistent manner.

Trying different kiteboarding gear

One of the best things about the sport of kiteboarding is the wide variety of gear that we can choose from. Putting the kites aside and looking at just the boards, there are so many directions we can go. Twin tips, skim boards, surfboards, paddle boards and now the advent of kiting with foil boards. The fact that kiteboarding is such a friendly sport makes it pretty easy to just walk up to one of your kiting friends and just ask “hey can I try your board?” I don’t think I have ever had anyone say “go get your own!” Even if you are happy with what you are using, you should make a habit of trying new boards when ever you get the chance. Especially from one style or discipline to another. The more boards you try the more you will start to understand the differences in the designs, the pros and cons. Really what is the worst thing that could happen? You might fall into the water? Oh no! When trying something new, don’t forget to keep an open mind, you may not like it to start with, because you are not used to it, but give it a chance, learn how to use it properly, and you will add variety to your kiting life. There are also side effects of riding different gear that are not always obvious until you try it. Some boards are easier on the body than others, smoother in choppy water for instance. Never get stuck in a rut! Why did we learn to kite to start with? Just as an example, I recently tried a pair of boots on a board. I had tried something similar years ago and wasn’t very impressed. But giving them another try I found that they gave me a different kind of control than I was used to. I could see that they might actually give me an edge toward advancing my skills. And as an added side effect, I sensed they might even be easier on my feet and ankles as edging was easier due to the height of the boots against my calves. So next time you’re at the beach grab an unfamiliar board, give the owner a wink and take it for a spin. Don’t worry about what your old board thinks.

The final hurdle, onshore conditions at Jupiter Kite beach!

This post is bound to become one of my favorites to write. While much of what I discuss in this blog is addressed to kite boarders every where, this topic is directed to those riders who call Jupiter Kite Beach home, and those who travel to our town to kiteboard in our warm Gulf Streams waters. I am not going to discuss just kiting here on any average day…nope. We are going to discuss kiting at Jupiter in ( for some ) the most dreaded of all conditions…straight onshore wind, head high or bigger, rip the board from your feet, and always humbling shore pound! Talk to any Kiteboarder around the state and mention kiting in Jupiter and they will almost always mention how difficult it was breaching the shore break in East wind. Many near death experiences have occurred while making a late decision to turn away from a steep pitching lip and finding yourself tackled by the wave from behind like a Sumo Wrestler and tumbled with such force that it feels more like the first stage of Hell than your favorite kite spot. Some of the thoughts that go through our minds as we strive to survive the spin cycle are “I hope the board doesn’t hit me in the face”, “I don’t feel any tension in my kite lines, this can’t be good”, And when it seems like it will never end “will I ever breath air again?!”. While there are no fatalities to report thank God, many a novice kite warrior has had his pride and confidence shattered in their first attempts at charging the line. What’s more, as an aspiring Kiteboarder who is dedicated, and riding every chance he or she gets, there is a lot of east wind days during the South Florida kiteboarding season. We must master the skills needed if we want ride here all season. So her are some tips to think about. It still takes practice and perseverance, and really is just a fine tuning of the skills you have already learned while riding in side shore conditions.
First Goal The water start.
The first thing we must do is simply get into the water, get the board on our feet, and get up on plane. When the winds are on shore the waves are generally what we call a short period swell, 4 to 7 seconds between wave crests. This leaves us very little time to lay back in the water, get the board on our feet, dive the kite and get up to ride before the next wave is on us, pushing us back onto the beach. We need some advantage. And this advantage can be realized before you even get in the water. The key to this advantage is understanding that the contours under the water are responsible for the conditions of the surf at the surface. Deep water = ocean swells, no breaking waves. Shallow water= steep breaking waves. My point is that all beaches are not created equal. Every 100 meters or so the conditions near the shore can vary widely. What makes the shore break at Jupiter Kite beach so intense is relatively deep water on the outside sand bar, which allows the swells full energy to travel all the way to the beach, then break with great intensity in the shallow water close to shore. If you stand on the stairs or some high vantage point and look up and down the beach you will see that some locations are constantly bombarded by steep crashing waves, while other spots have very small shore break, only knee high. That is where you want to get into the water. There was a time in Kite Beach history when all of the riders discovered this fact, and that there was a beach that had this “easy entry” quality, and we all moved to that beach for a time. Then we realized that it had much more beach goer traffic and it was in the best interest of the sport to move back to Kite Beach. Tides can have an effect on conditions as well, high tide being the worst time to enter the water. If you find yourself struggling, take a break and return later when the tide is lower.
Second Goal Board speed.
The next thing is to get up to speed. Like I have previously mentioned we are really just fine tuning the skills that we should already possess. If you have been kiting in side shore, or side on conditions, the course you have been sailing is a few degrees upwind. And it seems that you make pretty easy progress getting through any waves. Now that the wind is straight onshore your course should still be just a few degree upwind, but what has changed is your relationship to the waves. Instead of jumping the waves at a 45 degree angle, now you are running nearly parallel to the waves, and this is psychologically difficult for us. With white water nipping at our heels, and the dry sand staring us in the face, we want more than anything to get through the surf as quickly as we can. The common result is “Pinching”. Pinching is a sailing term used to describe turning your boat or board too high into the wind resulting in little or no forward speed. You need speed first! So sail a course that is parallel to the shore until you have sufficient speed to ride upwind. Pinching your way up to some steep knarly ones, you are just asking for a beating! The best strategy is to ride as if you have no intentions of getting out through the surf. There is no shame in riding between the impact zone and the beach, just be ready to sheet out in case you are pulled onto the beach.
Third Goal Hopping waves.
As you are riding parallel to the beach to gain speed, you will encounter waves every 4-7 seconds. How you handle hopping these waves will determine whether you ride for the next 5 minutes or only the next 5 seconds. So you have been riding in the side-on conditions and jumping the waves at a 45 degree angle, pretty easy to stay on the tail of your board and let the nose ride up and over. Now riding parallel to the waves you will find that the top, or deck of your board is exposed to the approaching white water (and impending doom!), you must not let the white water pile onto you deck or you will go down. As the wave approaches, maybe as early as 3 seconds before it reaches you, carve sharply upwind and rock your board to your toe edge just enough to expose the bottom of your board to the approaching white water. As soon as you have passed over the white water regain speed by pointing your board on the original parallel to the beach course. So… get speed…carve up and over…steer back onto speed course …carve up and over…you will develop a rhythm. Over time you will learn that there is very little power to be had while you are on or just behind the white water, because the energy of the wave decreases your “apparent wind”. But we’ll discuss that in a future post.
Fourth Goal Breeching the impact zone.
Now that you have some speed and have managed to hop the white water with some rhythm and consistency, its time to ride up wind and conquer the demons whose aim is to send you back to the beach with your little mammal nub between your legs. The key elements to this task are observation, good decision making and timing. Never head upwind into the gauntlet and assume you will ride a straight course into deep water. Looking ahead you are constantly making decisions. “Should I head out a little further?” or “Turn away from that steep one!”, “Run down wind a little further, the time is not right”. Slowly work your way upwind, hopping the white water as it comes, learn to read the waves and when and where they are breaking, it’s not random, there is a shallow fixed sand bar causing the swell to break. DO NOT RUSH! As you ride looking 20 meters ahead, observing the man crushing violence of heavy water, suddenly…there it is, the window, a pause in the mayhem! HEAD OUT!
After riding back and forth across the same stretch of beach you may find that your way out happens to be in the same place each time. Again, not a coincidence. The bottom has deep spots as well as sand bars, and these deep spots usually create rips and are good places to head out.
I personally enjoy the spontaneity required to ride in the onshore winds at Jupiter Kite Beach. And I think a lot of the experienced riders will agree. They are some of our favorite conditions. Maybe the reason is that it is always a challenge, and a great time to hone your skills, and be tested. The riders that you see outside in these conditions have all paid their dues, praying for forgiveness as they are held to the bottom, digging sand from their ears 3 days later. Take it one session at a time, one step at a time, one wave at a time and we’ll all be riding. But don’t think that getting out a handful of times will be the end of it, every once in a while we all are humbled, caught with loose lines, face to face with a deep dark pit!

What is this “Wind Window” in Kiteboarding

While giving lessons there is a term that is used frequently to describe what is going on in the sky, “the wind window”. What is this wind window? It sounds so mystical and ethereal. As I mention it in discussion I can see the students eyebrows twitch as they struggle to understand. The wind wind is invisible, windows are clear, that leaves us thinking we are expected to look through something that can already see through…hugh? So let me try to help. First of all the term should be “The kites wind window” because without the kite, there would be no wind window. The kites “wind window” is anywhere in the sky where the kite can fly in relation to the pilots position at the time. That space in the sky or wind window is determined or defined by the length of the kite lines, and the direction of the wind.
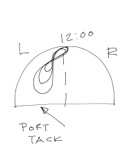
Let’s start with a more simple kite. We all flew single line kites as kids. When you rolled out that line and launched the kite down wind it flew up to a particular altitude and at some point it came to a stop in the sky. As it flew it would wonder to the left 10 ft. to the right 10 ft. as the wind shifted, and maybe climbed or fell 10 ft. as the wind puffed and holed. So that single line kite had a wind window covering some 100 square ft. of sky. If you recall the kite would move no further into the wind without tugging on the line and still it would just settle back to where it was comfortable flying…that kite is said to be “at the edge of its wind window” it does not have the ability to fly any further up wind. With 4 line kites we have the ability to steer the kites around in the sky. These kites have a much bigger wind window. If we are flying a kite on 20m kite lines, the typical wind window for a modern power kite would be shaped like a quarter sphere. Starting at 20 meters to the pilots right and 90 degrees to the wind and following a 20 meter radius down wind and around 180 degrees all the way to the pilots left , and a 20 meter radius up and over the pilots head (9:00, 10:00, 11:00, 12:00 ) and back down on his right (1:00, 2:00, 3:00) defines the “edge” of this kites wind window. Why can’t the space 23 meters from the pilot be considered part of the wind window? Because the kite lines are only 20 meters long. Why can’t the the space 98degrees upwind from the pilot be considered part of the wind window? Because Kites are designed with a certain amount of induced drag to keep the kite just a little down wind of us. Any of the space between the ground and the edges is considered “The kites wind window”.
Power zone: Now that we know that the wind window is a quarter sphere with an edge, we need to divide, and define again. When the kite flys to the edge of the wind window we say the the kite is “neutral” or has little power. Remember no matter if the kite is at 2:00, 10:00 or 12:00 it is at the edge and is neutral. If the kite has been steered into a lower position in the wind window the angle of attack between the wind and kite increase and now the kite is said to be in “the power zone”. The power zone is where we dive the kite at the moment we want to water start, and get get up on the board.
Wind window division: As kite boarders we are usually concerned with riding in a particular direction, to the right ( starboard tack) or to the left ( port tack) . To achieve this we divide the wind window into two sides. From the top of the wind window (12:00) straight down wind to the ground in front of us, now there is a right side and a left side to the wind window.
So it’s not so mystical after all, just a way of describing where the kite can fly, where it may be, or may not be…ok maybe it’s still a little mystical.